TortoiseHG (w/ Mercurial) is an open source, and excellent, VCS. The TortoiseHG portion is a GUI interface that is linked to the right-click menu on Windows during install. Mercurial is the command line portion. Mercurial repositories can be converterd to Subversion repositorites, and vice versa, are supported in multiple IDE's such as Eclipse and NetBeans, and is VERY easy to use. I will put a mini listing of common Mercurial commands at the end of this post.
Without further ado, let's get started!
First of all, you need to download to pieces of software:
VisualHG:
- http://visualhg.codeplex.com/
TortoiseHG:
- http://tortoisehg.bitbucket.org/
After downloading these items, install TortoiseHG first (do not restart after install, unless you REALLY, REALLY, want to) :-)
Next, install VisualHG. This is the piece that integrates with VS 2008. After this is installed, NOW restart your computer.
Once your computer has come back up and you have logged in with your complex password, it is time to go through the "grueling" (it really shouldn't take very long to do this) steps of adding the VCS to your VS 2008.
Open Open Visual Studio 2008.
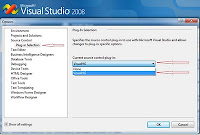
->Tools->Options
- Select "Show all settings" (Screenshot below)

Select "Source Control" in the right-hand menu
- Select "Plug-in Selection"
Select drop down in left side
- Select VisualHG
Before creating or using your repository, depending on how you installed, you may need to configure some settings, such as user ID. Configuration and Operation actions in TortoiseHG can be easily accessed from the right-hand GUI options (see screenshot below), or from the command line (again, this is really the Mercurial piece of the software). The command line options will open the respective GUI interface in most instances. I will be using the command line options in this manner.

If you used the most recent release, your username was created during install. If you don't need to create any other configurations, such as web shares, proxy, etc, skip to number 2.
1. To initially configure TortoiseHG:
- hgtk userconfig
2. Once this is done, a local repository needs to be created. This has to be created using TortoiseHG (VisualHG cannot create repositories.
- hgtk init [destination]
- The GUI will open a smaller window. In this window you can confirm or change the reposity location, allow for special files such as .hgignore, and make the repository compatible with older versions of Mercurial.
- I recommend using your current Visual Studio 2008 Projects folder becuase after creating the repository, a commit can be performed, causing everything to be controlled/monitored from that point forward.
- Once this repository has been created, the folder Icon will change to show a checkmark inside of a small green cirle. Initially, if you browse deeper into this folder, you will see the same checkmark in a green cirle in files and folders.
3. To test the version control system, make a simple change to any project file, and then navigate to that file.
- an exclamation mark should be visible on the lowest level file that you changed (and any resource files).
That's it. You should now have a local Source Code Version Control System for you Visual Studio 2008. There are ways to create your own using the VS2008 SDK, but I am not a person with the time to do so right now.
For general information on Mercurial command line options:
$ hg help or $ hg help [command] for more specific help
Generally, the Mercurial command line is intuitive for those who have dealt with VCS's before, and easy to learn for those who have not. Common 'keywords' for actions are the majority of the commands, with paramaters usually limited to comments, username, password, URL, etc. Some example commands:
- $ hg pull
- pulls from a repository
- $ hg commit
- commits changes to the current working directory/repository
- $ hg push
- pushes new files up to a repository
- $ hg status
- displays a status of the current repository (what changed)
- $ hg merge
- merge changes accross branch
- $ hg resolve
- attempt to re-merge unresolved files
- $ hg heads
- show branch heads
An excellent cheat sheet that will get you started with Mercurial commands is at the following link:
http://mercurial.selenic.com/wiki/QuickReferenceCardsAndCheatSheets?action=AttachFile&do=get&target=Mercurial-Cheatsheet-Adrian-v1.0.pdf
Nice article, I've been playing around with VisualHG, and your blog cleared up a few things for me. Wondering though if its possible to merge using the VS interface, or if you have to do it from the command line only?
ReplyDeleteEllen, Sorry for a late reply on this. I will try to answer this in a new posting in the next week. The integration with VS is actually pretty easy. Glad my post could help some and I plan to do a better job reading comments in the future. :-)
ReplyDeleteDW