In my last post, in a somewhat sarcastic tone, I discussed a simple batch file to make use of mergecap.exe. After that long post, I still feel like discussing the awesomeness that is Wireshark.
So, here I offer two quick tidbits:
A GREAT reference sheet (there is also a tcpdump sheet here as well):
http://www.packetlife.net/media/library/13/Wireshark_Display_Filters.pdf
An example of the simplicity of the power:
If I know that I want TCP streams 4, 9, 71, and 120, I can do so easily by:
- entering the filter:
tcp.stream eq 4 || tcp.stream eq 9 || tcp.stream eq 71 || tcp.stream eq 120
- applying said filter
- selecting "File" -> "Save As"
- in the bottom left of the 'Save As' Window will be a boxed in area. Select the "Displayed" radio button over the right column.
- Give your file a name
You now have a pcap file of just the tcp streams you want!
Tuesday, February 23, 2010
Combining the pcap files quickly
<>
An updated to this post, based on the last comment that I had recieved:
I agree that Pcapjoiner and some other tools can do this quickly, as well as add some other functions.
I like the fact though that there are these tools built into Wireshark that allows for the quick combo of just a few targeted pcaps. Basically, a way to get to the down and dirty of analysis on one more connections.
This has given me a GREAT idea for two/three/four more blog posts that would love to do:
1) building my own interface to do these merges, and other massaging that might be helpful. I am already picturing a ton of ways to go with this...maybe best to keep it simple...but it could be a fun projec for myself...adding the ability to run som stats, filters, create some xml/xhtml/html output in addition to output usalbe by tcpdump, wireshark, and ngrep.
2) to play around with the options of mergecap from the command line and try to add some filters by piping to/from ngrep or tcpdump. I think this should work just fine, and would allow for a larger number of files to be processed easily by mergecap in the dump.
3) a perl script that I can just drag a group of files onto for the merge. Perl's CPAN modules provide some excellent support for network traffic
4) a perl script to strip out whatever I want from a fully captured session: the webpage, a pic, the VoIP call, etc. This one might be a little harder....but sounds REALLY fun to me.
dw
<>
The other day I finally became fed up with the process of using the Wireshark GUI on Windows to combine more than two PCAP files. I think some folks I know would give me a "Gibbs' Slap" if they knew just how many times I used the GUI to combine 15+ captures. (If you don't know what a "Gibbs' slap" is, you REALLY need to start watching the original NCIS, and NO, not the lousy NCIS:Los Angeles)
Unless things have changed (and I admit to not recently trying), it is generally easy in *nix to pass/search a directory of *.pcap files to the Mergecap.exe util of the Wireshark release, combining ALL the PCAP files into a specified output file. However, and I know this is [NOT] a shock to most people, it is not always as easy to do this same thing on the windows command line (which I was stuck using for this). Of course, I have 20-30 more years before I am a cmd line ninja, so there may be a very easy way to do this...but I don't know it and my friend Google couldn't find it. This left me with a huge whole in my life as I REALLY wanted a better and FASTER way to do this.
Before beginning this walk down my pcap-crazy mental train track, just a quick recap of how to use mergecap.exe:
Usage: mergecap [options] -w...
So if I just want to merge some pcap files from a desktop folder into a file called merged.pcap:
C:\Program Files\Wireshark\mergecap -w merged.pcap "c:\users\UnixUsersAreCooler\Desktop\Some Pcap Files\1.pcap" "c:\users\UnixUsersAreCooler\Desktop\Some Pcap Files\2.pcap" "c:\users\UnixUsersAreCooler\Desktop\Some Pcap Files\3.pcap"
This will combine the 1.pcap, 2.pcap, and 3.pcap files into the newly created merged.pcap. However, in case it went un-noticed, that is a LOT of typing to combine three files. Isn't there an easier way?
The Choices:
1) Write a GUI that let me quickly select multiple files, creates the command line string for mergecap with these files, and executes the command. Great! Except, do I really want to create a GUI to do this?
2) Write a command line program to parse a specified folder for all pcaps, create the command string, then execute.
3) Create a script or bat file to do what I want, when I want.
4) Give up and begin a life of cheap booze and cheaper women.
The answers:
1) Nope. Little bit to lazy to spend the time to create the GUI that will make me spend more time navigating directory structures and selecting n files.
2) Nope. Lazy...see number 1 above.
3) This sounds like the way to go.
4) Might work, but then wife and kids might become irritated with such a choice. Back to number 3.
So now that it is decided that I am lazy, and can't chase women or whiskey, it's on to the scripting. There are multiple options here as well, but I kept it simple, dug up some examples, tweaked them for me, and went back to watching Office Space.
The batch file:
combine.bat:
setlocal
set myfiles=
for %%f in (*.pcap) do set myfiles=!myfiles! %%f
Cmd /V:on /c "c:\Program Files\Wireshark\mergecap.exe" -w temp.pcap %myfiles%
What does this mean and where does it go? I created a folder on my desktop for the pcaps I want to merge; the bat file goes here. To run this, I could double-click the file, but I prefer to see it in action . With that in mind, I open up a command prompt in the folder where the bat file is stored, and then execute:
$>combine.bat
The important things I want to point out here is the "Cmd /V:on /c ...". What this does:
- CMD /V:on re-calls the cmd.exe from the system32 directory with the setting of the delaying environment variables (/V:on).
- /c means to "run the following command." In this situation, no environment variables for the PATH for mergecap exist, so I need to call it directly, passing the remainder of the string as the arguments.
- myFiles is an array of all .pcap files in the directory where the script resides. Without the "/V:on" option, only the last file name passed by the 'for' will be present when the command executes.
This entry took longer to create then the batch file, but I hope it helps some angry analyst somewhere.
An updated to this post, based on the last comment that I had recieved:
I agree that Pcapjoiner and some other tools can do this quickly, as well as add some other functions.
I like the fact though that there are these tools built into Wireshark that allows for the quick combo of just a few targeted pcaps. Basically, a way to get to the down and dirty of analysis on one more connections.
This has given me a GREAT idea for two/three/four more blog posts that would love to do:
1) building my own interface to do these merges, and other massaging that might be helpful. I am already picturing a ton of ways to go with this...maybe best to keep it simple...but it could be a fun projec for myself...adding the ability to run som stats, filters, create some xml/xhtml/html output in addition to output usalbe by tcpdump, wireshark, and ngrep.
2) to play around with the options of mergecap from the command line and try to add some filters by piping to/from ngrep or tcpdump. I think this should work just fine, and would allow for a larger number of files to be processed easily by mergecap in the dump.
3) a perl script that I can just drag a group of files onto for the merge. Perl's CPAN modules provide some excellent support for network traffic
4) a perl script to strip out whatever I want from a fully captured session: the webpage, a pic, the VoIP call, etc. This one might be a little harder....but sounds REALLY fun to me.
dw
<
The other day I finally became fed up with the process of using the Wireshark GUI on Windows to combine more than two PCAP files. I think some folks I know would give me a "Gibbs' Slap" if they knew just how many times I used the GUI to combine 15+ captures. (If you don't know what a "Gibbs' slap" is, you REALLY need to start watching the original NCIS, and NO, not the lousy NCIS:Los Angeles)
Unless things have changed (and I admit to not recently trying), it is generally easy in *nix to pass/search a directory of *.pcap files to the Mergecap.exe util of the Wireshark release, combining ALL the PCAP files into a specified output file. However, and I know this is [NOT] a shock to most people, it is not always as easy to do this same thing on the windows command line (which I was stuck using for this). Of course, I have 20-30 more years before I am a cmd line ninja, so there may be a very easy way to do this...but I don't know it and my friend Google couldn't find it. This left me with a huge whole in my life as I REALLY wanted a better and FASTER way to do this.
Before beginning this walk down my pcap-crazy mental train track, just a quick recap of how to use mergecap.exe:
Usage: mergecap [options] -w
So if I just want to merge some pcap files from a desktop folder into a file called merged.pcap:
C:\Program Files\Wireshark\mergecap -w merged.pcap "c:\users\UnixUsersAreCooler\Desktop\Some Pcap Files\1.pcap" "c:\users\UnixUsersAreCooler\Desktop\Some Pcap Files\2.pcap" "c:\users\UnixUsersAreCooler\Desktop\Some Pcap Files\3.pcap"
This will combine the 1.pcap, 2.pcap, and 3.pcap files into the newly created merged.pcap. However, in case it went un-noticed, that is a LOT of typing to combine three files. Isn't there an easier way?
The Choices:
1) Write a GUI that let me quickly select multiple files, creates the command line string for mergecap with these files, and executes the command. Great! Except, do I really want to create a GUI to do this?
2) Write a command line program to parse a specified folder for all pcaps, create the command string, then execute.
3) Create a script or bat file to do what I want, when I want.
4) Give up and begin a life of cheap booze and cheaper women.
The answers:
1) Nope. Little bit to lazy to spend the time to create the GUI that will make me spend more time navigating directory structures and selecting n files.
2) Nope. Lazy...see number 1 above.
3) This sounds like the way to go.
4) Might work, but then wife and kids might become irritated with such a choice. Back to number 3.
So now that it is decided that I am lazy, and can't chase women or whiskey, it's on to the scripting. There are multiple options here as well, but I kept it simple, dug up some examples, tweaked them for me, and went back to watching Office Space.
The batch file:
combine.bat:
setlocal
set myfiles=
for %%f in (*.pcap) do set myfiles=!myfiles! %%f
Cmd /V:on /c "c:\Program Files\Wireshark\mergecap.exe" -w temp.pcap %myfiles%
What does this mean and where does it go? I created a folder on my desktop for the pcaps I want to merge; the bat file goes here. To run this, I could double-click the file, but I prefer to see it in action . With that in mind, I open up a command prompt in the folder where the bat file is stored, and then execute:
$>combine.bat
The important things I want to point out here is the "Cmd /V:on /c ...". What this does:
- CMD /V:on re-calls the cmd.exe from the system32 directory with the setting of the delaying environment variables (/V:on).
- /c means to "run the following command." In this situation, no environment variables for the PATH for mergecap exist, so I need to call it directly, passing the remainder of the string as the arguments.
- myFiles is an array of all .pcap files in the directory where the script resides. Without the "/V:on" option, only the last file name passed by the 'for' will be present when the command executes.
This entry took longer to create then the batch file, but I hope it helps some angry analyst somewhere.
Friday, February 19, 2010
Version Control and Visual Studio 2008
Anyone who programs and creates projects larger than the standard HelloWorld application has probably experienced a day like: they really wish they wouldn't have adjust those last 100 lines of code and forgot where and why in the process. As most know, a Version Control System (VCS), can greatly help a programmer to track changes, whether it is in the development phase or in maintenance. In Visual Studio 2008, there are a couple of ways to add a VCS: through the VS SDK or by grabbing a good release already available. Here I am going to quickly describe how to get TortoiseHG/Mercurial working with Visual Studio 2008 Professional. I have done this on a box running Windows 7.
TortoiseHG (w/ Mercurial) is an open source, and excellent, VCS. The TortoiseHG portion is a GUI interface that is linked to the right-click menu on Windows during install. Mercurial is the command line portion. Mercurial repositories can be converterd to Subversion repositorites, and vice versa, are supported in multiple IDE's such as Eclipse and NetBeans, and is VERY easy to use. I will put a mini listing of common Mercurial commands at the end of this post.
Without further ado, let's get started!
First of all, you need to download to pieces of software:
VisualHG:
- http://visualhg.codeplex.com/
TortoiseHG:
- http://tortoisehg.bitbucket.org/
After downloading these items, install TortoiseHG first (do not restart after install, unless you REALLY, REALLY, want to) :-)
Next, install VisualHG. This is the piece that integrates with VS 2008. After this is installed, NOW restart your computer.
Once your computer has come back up and you have logged in with your complex password, it is time to go through the "grueling" (it really shouldn't take very long to do this) steps of adding the VCS to your VS 2008.
Open Open Visual Studio 2008.
->Tools->Options
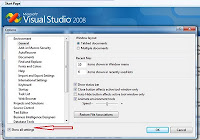
- Select "Show all settings" (Screenshot below)
Select "Source Control" in the right-hand menu
- Select "Plug-in Selection"
Select drop down in left side
- Select VisualHG

TortoiseHG (w/ Mercurial) is an open source, and excellent, VCS. The TortoiseHG portion is a GUI interface that is linked to the right-click menu on Windows during install. Mercurial is the command line portion. Mercurial repositories can be converterd to Subversion repositorites, and vice versa, are supported in multiple IDE's such as Eclipse and NetBeans, and is VERY easy to use. I will put a mini listing of common Mercurial commands at the end of this post.
Without further ado, let's get started!
First of all, you need to download to pieces of software:
VisualHG:
- http://visualhg.codeplex.com/
TortoiseHG:
- http://tortoisehg.bitbucket.org/
After downloading these items, install TortoiseHG first (do not restart after install, unless you REALLY, REALLY, want to) :-)
Next, install VisualHG. This is the piece that integrates with VS 2008. After this is installed, NOW restart your computer.
Once your computer has come back up and you have logged in with your complex password, it is time to go through the "grueling" (it really shouldn't take very long to do this) steps of adding the VCS to your VS 2008.
Open Open Visual Studio 2008.
->Tools->Options
- Select "Show all settings" (Screenshot below)

Select "Source Control" in the right-hand menu
- Select "Plug-in Selection"
Select drop down in left side
- Select VisualHG
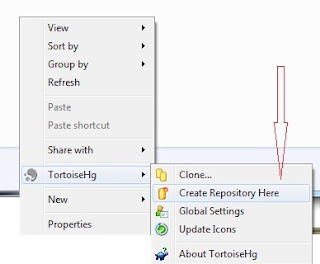
Before creating or using your repository, depending on how you installed, you may need to configure some settings, such as user ID. Configuration and Operation actions in TortoiseHG can be easily accessed from the right-hand GUI options (see screenshot below), or from the command line (again, this is really the Mercurial piece of the software). The command line options will open the respective GUI interface in most instances. I will be using the command line options in this manner.

If you used the most recent release, your username was created during install. If you don't need to create any other configurations, such as web shares, proxy, etc, skip to number 2.
1. To initially configure TortoiseHG:
- hgtk userconfig
2. Once this is done, a local repository needs to be created. This has to be created using TortoiseHG (VisualHG cannot create repositories.
- hgtk init [destination]
- The GUI will open a smaller window. In this window you can confirm or change the reposity location, allow for special files such as .hgignore, and make the repository compatible with older versions of Mercurial.
- I recommend using your current Visual Studio 2008 Projects folder becuase after creating the repository, a commit can be performed, causing everything to be controlled/monitored from that point forward.
- Once this repository has been created, the folder Icon will change to show a checkmark inside of a small green cirle. Initially, if you browse deeper into this folder, you will see the same checkmark in a green cirle in files and folders.
3. To test the version control system, make a simple change to any project file, and then navigate to that file.
- an exclamation mark should be visible on the lowest level file that you changed (and any resource files).
That's it. You should now have a local Source Code Version Control System for you Visual Studio 2008. There are ways to create your own using the VS2008 SDK, but I am not a person with the time to do so right now.
For general information on Mercurial command line options:
$ hg help or $ hg help [command] for more specific help
Generally, the Mercurial command line is intuitive for those who have dealt with VCS's before, and easy to learn for those who have not. Common 'keywords' for actions are the majority of the commands, with paramaters usually limited to comments, username, password, URL, etc. Some example commands:
- $ hg pull
- pulls from a repository
- $ hg commit
- commits changes to the current working directory/repository
- $ hg push
- pushes new files up to a repository
- $ hg status
- displays a status of the current repository (what changed)
- $ hg merge
- merge changes accross branch
- $ hg resolve
- attempt to re-merge unresolved files
- $ hg heads
- show branch heads
An excellent cheat sheet that will get you started with Mercurial commands is at the following link:
http://mercurial.selenic.com/wiki/QuickReferenceCardsAndCheatSheets?action=AttachFile&do=get&target=Mercurial-Cheatsheet-Adrian-v1.0.pdf
Wednesday, February 3, 2010
Windows Rocks???
Normally, I would say that I prefer anything *nix to Microsoft. However, I think I may be equally pleased with Windows 7 as I am with *nix...much to my own surprise!
I had played with the 7 beta when it was first made available, but only enough to do a clean install and look around the GUI. I had quickly decided it looked too much like Vista (which I don't mind so much now) and went back to other tasks. This may have been a mistake.
This last weekend, I decided to re-build one of my boxes in order to have a dedicated development and analysis box. My other dev environment had become too congested as I was admittedly lazy and used it for many other non-dev tasks.
I had a list of software I just had to have, for both personal preference and for school requirements. The major items were:
- SQL Server 2008
- Oracle 11g
- Visual Studio 2008 Pro
- Eclipse (with multiple platforms and tools)
- Android SDK
- NetBeans 6.8
- Visio 2007
- Cisco VPN client
- IIS 7
- UDDI SDK
- Tomcat 6
I was reluctant to slap all of this onto Windows 7 Pro. However, the box I was using was sold to me by Dell with Vista, and an AMD processor later found not to support Vista, and some of the drivers I needed for the box were not compatible with XP Pro. Thus, my decision to try to use Windows 7 Pro.
Windows 7 Pro installed clean AND faster than half of the software listed above. The total time to install 7, the software above, some minor other software, and ALL patches was about six hours (including beer breaks!). I was able to verify that IIS and Tomcat 6 are playing well together, I easily tested my dev tools by slapping together some quick code, and my DB's are accessible, secure, and working well!!!
Bottom line: as much as I love *nix, Windows 7 Pro (So far) ROCKS!!! The only pain I had was that I had to slap on an older .Net Framework in order to register the Microsoft.Uddi.dll.
Subscribe to:
Posts (Atom)